
Step 1 - What kind of monitor do I need?
The first thing you will need to do is find out what kind of port you will be using to connect your second monitor.
Below, you will see an image of the most common types of display ports.
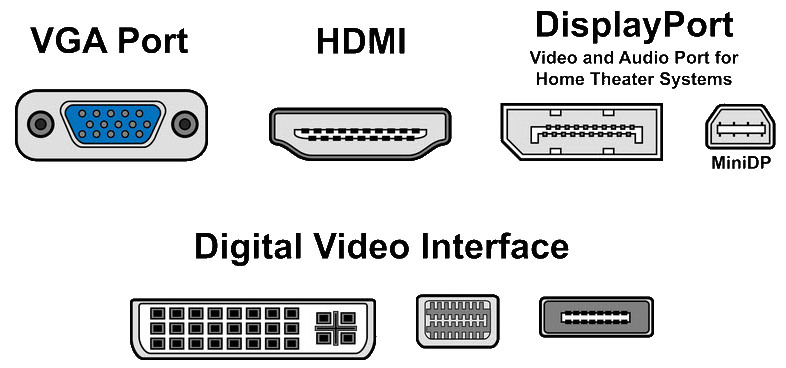
Once you find out which display ports your computer supports, you will need to use a monitor that has that type of connection.
DVI and HDMI will give you the best quality.
(DVI [bottom-left in image] and HDMI are among the most common ports for most laptops and desktops.) If you have VGA, most DVI monitors supply a VGA-to-DVI adapter or it can be purchased at any retail store that sells monitors.
Step 2 - Connecting the display
Once you have selected a monitor that works with your system, you will need to connect the monitor to your computer.
You can plug the monitor in while the computer is turned on.
Once you have plugged in the monitor, Windows will detect the new display and attempt to expand your desktop. You can now setup your new display.
To do this, right-click on a blank area of your desktop and select "Display Settings".
Monitor Layout
After the "Display Settings" options come up, you will see 2 displays marked 1 & 2.
(NOTE:If you only see 1 monitor that has 1&2 inside of it, change the settings for Multiple Displays: from Duplicate Desktop to Extend Desktop to This Display)[For reference, look at the image under Primary Monitor in this article]
1 is your primary display (the display which will house your desktop icons and Start menu). 2 is your secondary monitor.
If you do not change the positions of the screens, you will notice that your mouse jumps to a higher or lower portion of the screen when you move the mouse between screens 1 & 2, instead of moving over smoothly. This step is optional, but the mouse effect can be annoying.
You can arrange the screens in the options to resemble the physical setup of your monitors, by dragging and dropping the appropriate monitor.
Primary Monitor
If you want to change your primary monitor, you can do so in the "Multiple Displays" setting by selecting monitor 2. After you select monitor 2, you should see a checkbox that says "Make this my main display". Check the box and click Apply to make the changes.
To revert the changes, select monitor 1 and check the box next to "Make this my main display". Click Apply, then OK.
That's it!
Now that you've setup your secondary display you should be able to move windows between both screens.
If you disconnect the monitor and plug it in later, your computer should remember the settings for that display, so you shouldn't need to worry about setting this up every time you need to disconnect the screen.
If you have any trouble or have any questions, please feel free to contact FNU IT at 859-251-4545 or email us at support@frontier.edu
Comments